-
How to Make a Photo Album using PowerPoint 2010
Posted on May 15th, 2012 No commentsYou may have taken a number of precious photos from time to time. In the past you may print it out and carefully put them in the family photo album book, but now they may be lying silently in your digital camera or one folder on your hard drive. Why not make a photo album with PowerPoint 2010, which helps you store and display these photos in a digital way?
Why choose PowerPoint? Microsoft PowerPoint should be installed on most of the computers, so you don’t need to find and buy other software to make a photo album. Besides, you should be familiar with PowerPoint so you don’t need to learn how to use it. PowerPoint is consisted of several slides, which are easy to be organized for you to tell a story in the right order. Besides, you can also add dynamic effects like animation, transition, background music, video clips and more to your PowerPoint photo album.
Now let’s take a look at the steps to make a photo album in PowerPoint 2010.
1. Open PowerPoint program, point to Insert tab, click the Photo Album button.
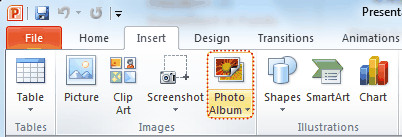
2. In the pop up window, click File/Disk button and choose the photos you want to include in the photo album from your hard drive. (The Photo Album function enables you to insert multiple photos to PowerPoint at a time.)
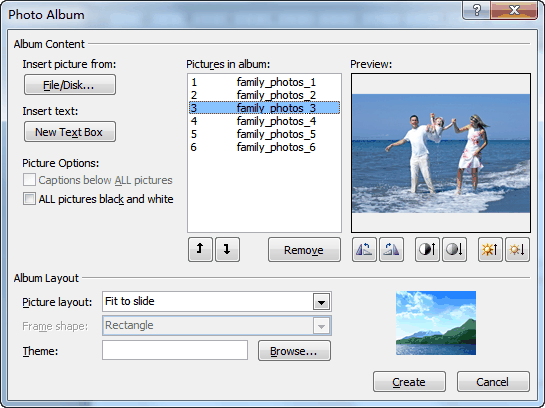
You will see the selected photos in the Picture in Album list. You can change the order by choosing a photo and clicking the Move Up or Move Down button. Below the preview of the photo, there are six buttons, which you can use to adjust the rotation, contrast and brightness of each photo.
Click Create to insert the photos.
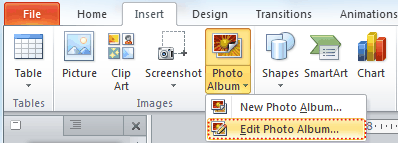
3. The photo album can be editable, any time you want to change the photo, order or effect, you can click Edit Photo Album. On the left of the preview, you can select Captions below All pictures to add subtitle for your album.
To add title for each photo, you should click Picture layout and choose x picture with title.
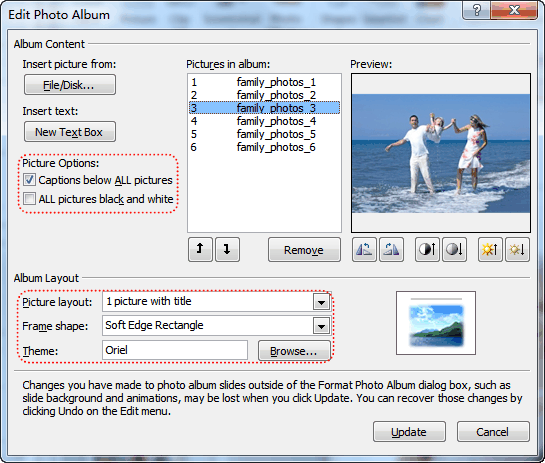
Click Update to apply the changes.
4. Apply a theme to your album
You can directly select an PowerPoint embedded theme by clicking Browse, or choose a theme from the Design tab of PowerPoint.
5. Add animation, transition, background music and video clips to the PowerPoint photo album.
Now you have finished your own photo album using PowerPoint 2010. Do you want to share your photo album with others? You can upload your self-made photo album to YouTube and let other people enjoy the happiness with you. To upload your photo album to YouTube, you should convert PowerPoint to video formats that YouTube accepts. Tool you need: Leawo PowerPoint to Video Converter.
Want to store your photo album permanently? In order to store the photo album forever and prevent from being edited, you can burn it on a DVD disc. Leawo PowerPoint to DVD Burner helps you store photo album on DVD disc for playback on TV whenever you like.
-
PowerPoint Tips – Grow/Shrink Animation to Photo
Posted on April 27th, 2012 No commentsIn this article we are going to tell you about the Grow/Shrink animation in PowerPoint 2010. Maybe you haven’t used it before, never mind, this is the right place for you to learn how. Grow/Shrink is one of the animations that original come along with PowerPoint 2010. Just like its animation brothers, it can be added to text or picture. But I think it would more useful adding to picture.
Assume that you’re making a Photo slideshow and PowerPoint is really an easy and powerful tool for you. Now, click “Insert” → and choose “Photo Album” to import all your photos into PowerPoint at one time. Each slide will have one photo on it.

Now you need to add some animations to these photos to make them alive. We have already used animations like “Fly In”, “Float In”, “Zoom” or “Bounce” too often, let’s try Grow/Shrink today!
Step 1: Select one photo and click “Animations” → “Add Animation” to add an animation to the picture. For PowerPoint 2007, this is a little different. You should click “Animations” → “Customize Animation” → “Add Effect” to add an animation.

Step 2: In the drop-down list, you will see many animations you can add to the photo and the “Grow/Shrink” animation is the one we need.
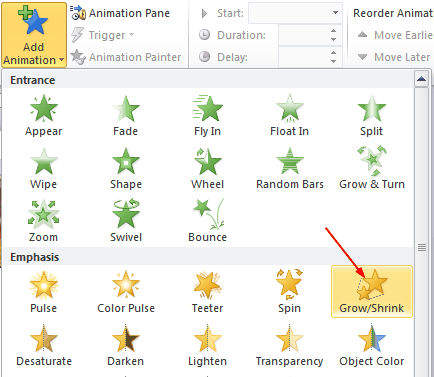
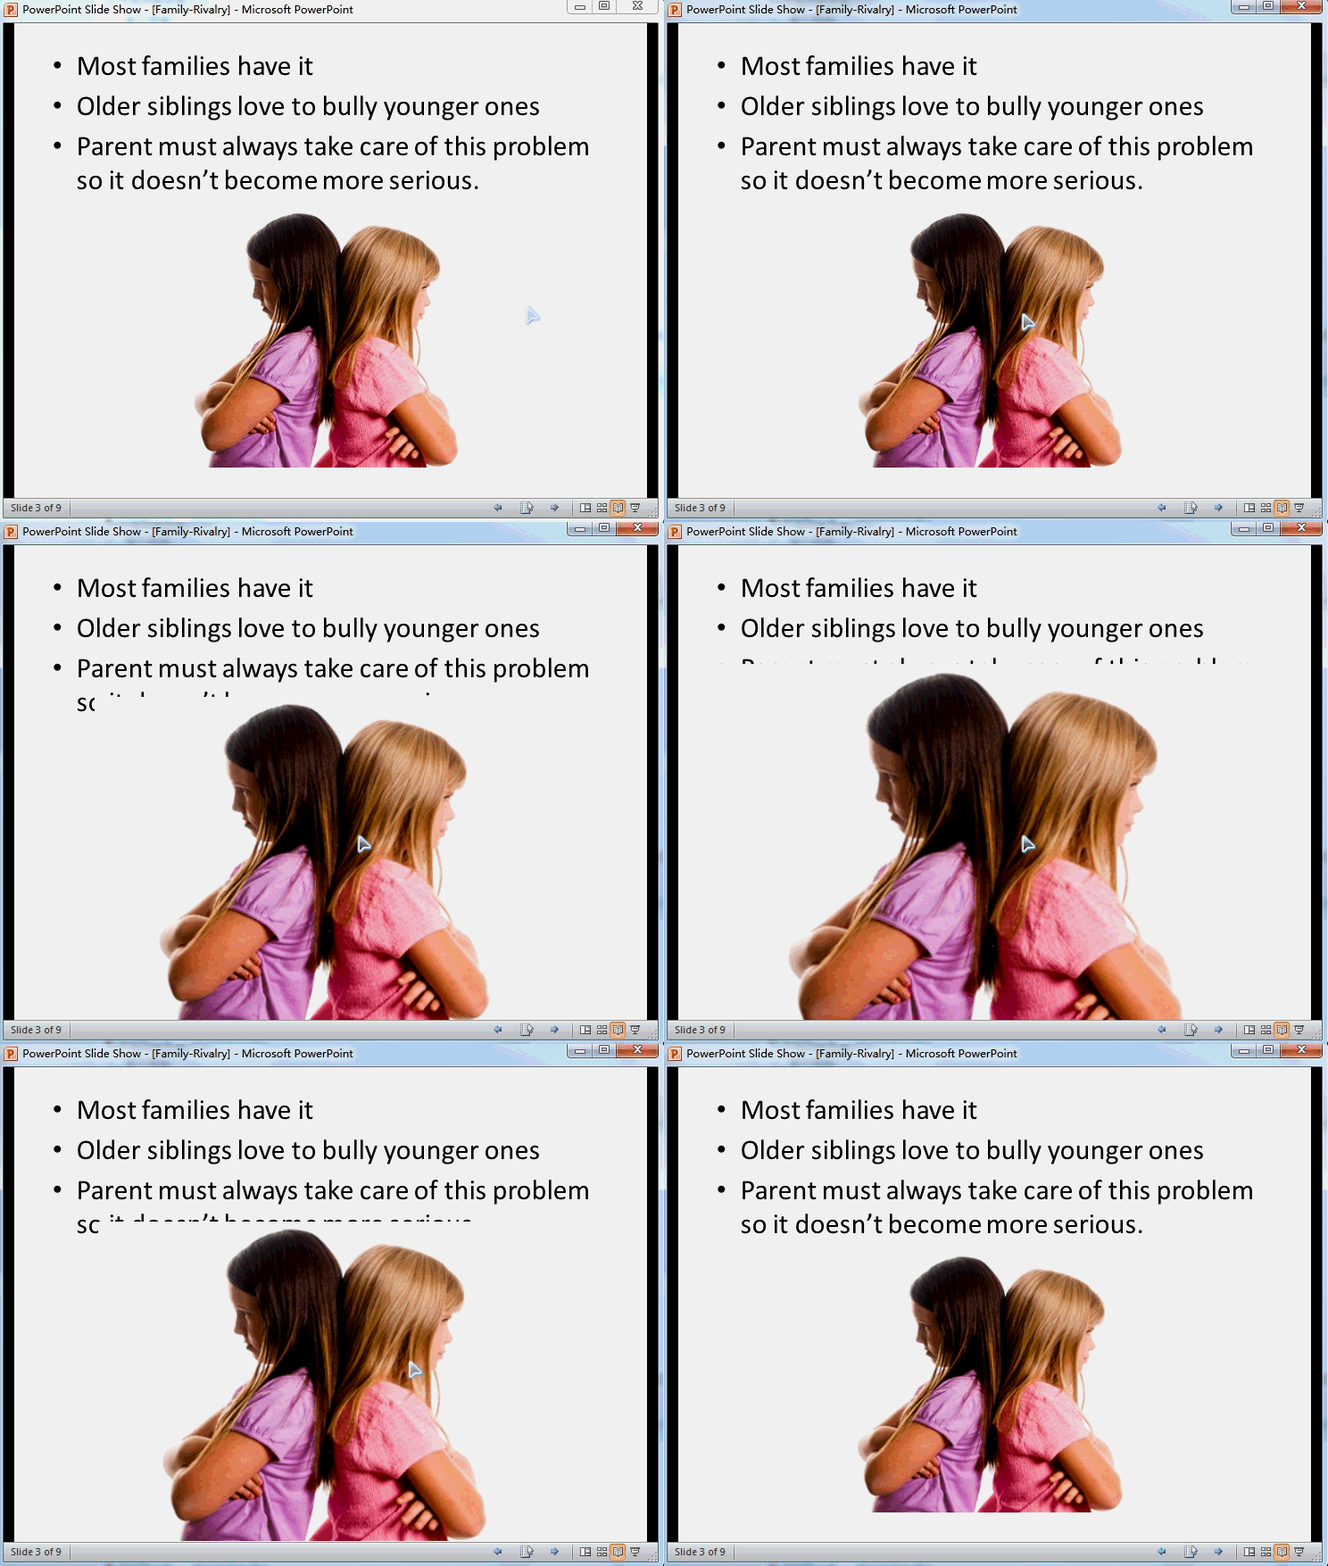
Step 3: Now click the mouse and the photo will expand to 150% larger by default (you can change the size too, you will see it later). The problem is that once clicked, the photo will remain the 150% size, and we need to shrink the photo back to normal. Insert the “Grow/Shrink” animation again. And click the “Animation Pane” to adjust the second animation.
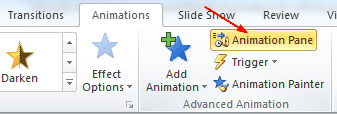
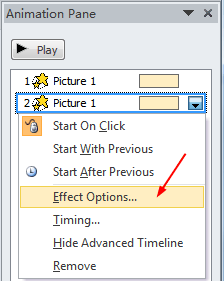
Step 4: The “Animation Pane” section will appear on the right of the slide section. Right click on the animation 2 and click “Effect Options”.
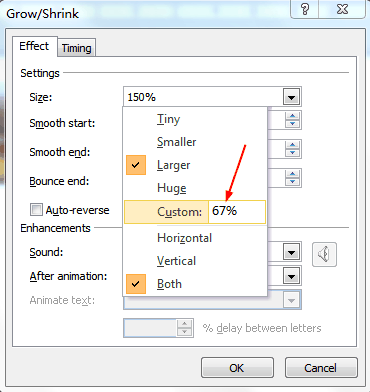
Step 5: In the pop up window, you will see the default size is “150%” (you can change the Grow size here), to click the mouse again and shrink the photo back to normal size, you should set the size as “67%” (100/150) and press “Enter”.
Try it! Click on the photo once and it will grow to 150% larger, click again and it will shrink back to normal, like:
займ на карту rusbankinfo.ru
-
Google Docs: Expand Your PowerPoint Presentation Experience
Posted on April 13th, 2012 No commentsWhen we want to create a presentation document, we would probably think of the almighty Microsoft PowerPoint. In the past, it’s the best way and the only way. But now we have a lot more options. There are many free alternative ways for us to choose to make presentations like Open Office, Libre Office, Kingsoft Office, SlideRocket and today’s star Google Docs. And they can be divided into two groups: software you need to install on your computer and online applications. Google Docs is the spokesman for all those online PowerPoint-like applications which enables you to view, create and sharer PowerPoint online.
What can Google Docs do?
1.Create PowerPoint presentations online.
First login Google Docs with your Gmail account. Gmail account gives access to Google Docs and other Google services. Your Google Docs homepage is like this, click the “Create” button on the left to start creating a presentation online.
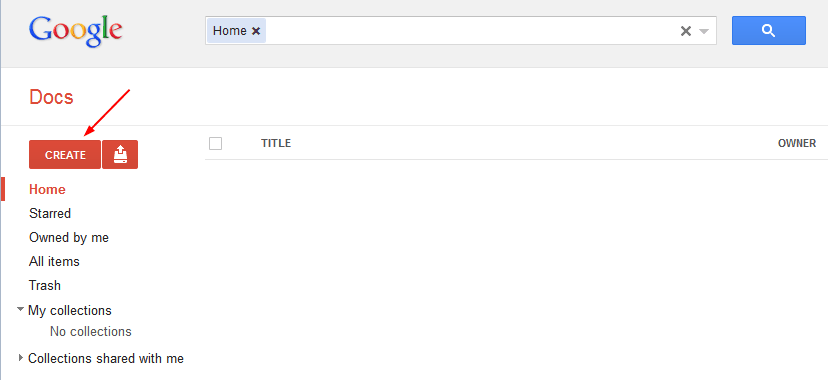
Google Docs is corresponding to Microsoft Office, so it can create Document (Word), Presentation (PowerPoint), SpreadSheet (Excel) and more other document files.
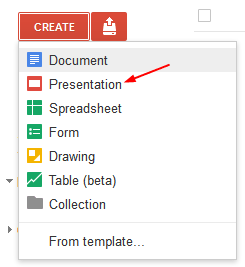
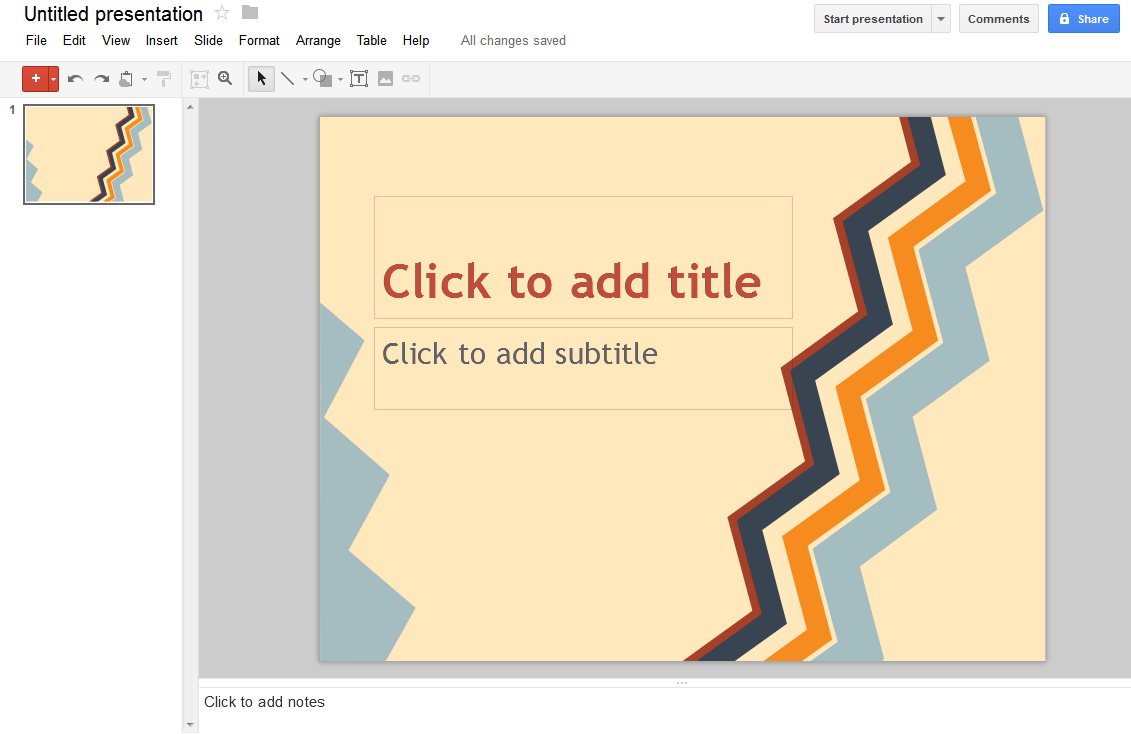
Click “Presentation” and you will enter this presentation page. With concise interface the Google products always have, you have nearly all the tools you need here to make a good presentation, like add pictures, video clips, transitions, animations, etc. But it’s a pity that you cannot insert music in Google Docs.
2.Save as PPTX format compatible with Microsoft PowerPoint.
After you have finished, you can download your presentation to your computer as PPTX format. PPTX is the latest format for PowerPoint 2007 and PowerPoint 2010 so your Google Docs presentation will be compatible with PowerPoint 2007 & 2010. This simple function seems nothing, but it is very useful in fact. Imagine that you need to create a PowerPoint presentation for school, but you don’t have Microsoft Office. Then you can create in Google Docs, download as PPTX and bring to school computer to play. Together with PowerPoint to video converter, you can even publish your Google Docs to YouTube.

3.Download as PDF format
If you search PowerPoint to PDF, you will find that there is great demand that people need to save PowerPoint as PDF format for all kinds of advantages that PDF format has. PowerPoint 2010 supports save as PDF directly, but for those PowerPoint 2007 or 2003 users, they will need a converter to save PowerPoint as PDF file. Now Google Docs serves as another solution to convert PowerPoint to PDF for free.
4.Upload Microsoft PowerPoint
Bring Microsoft PowerPoint and Google Docs even closer, upload PowerPoint files to Google Docs for viewing, editing and sharing with others. Adjacent to the “Create” button, click the “Upload” icon, and choose “Files” from the drop-down menu. Then select the PowerPoint file you want to upload and click “Open”.
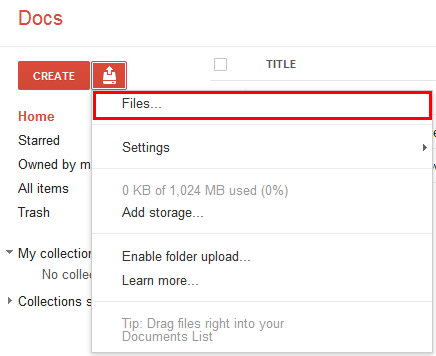
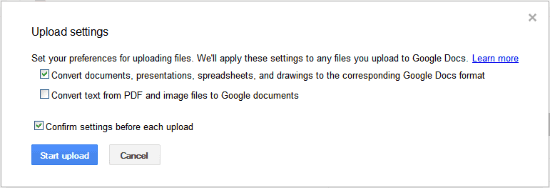
Check the “Convert documents, presentations, spreadsheets, and drawings to the corresponding Google Docs format” box if you need to edit the PowerPoint in Google Docs. Click “Start Upload”.
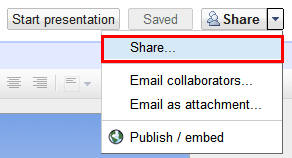
Now you can edit the uploaded PowerPoint file in Google Docs, like reset images, background music, etc. Let’s skip that part and directly click “Share” to publish it online.
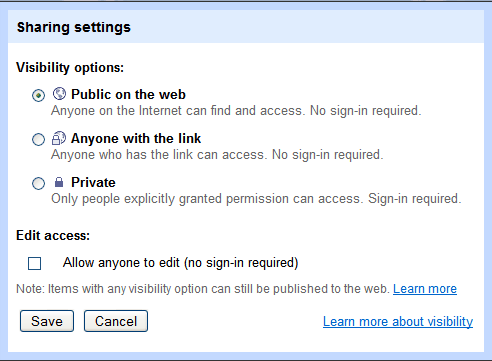
In the pop up dialog box, click “Change” in the “Private” line to choose who has access to the PowerPoint presentation.
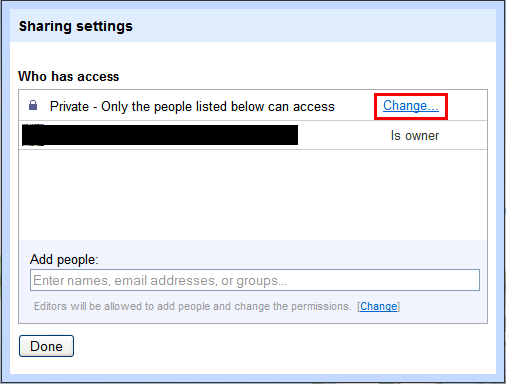
Now you can choose who can view or edit the PowerPoint file.
Have fun with all the best functions that Google Docs provides. What else can Google Docs do?
займ на карту rusbankinfo.ru
-
How to Reduce SWF File Size on Mac
Posted on March 27th, 2012 No commentsIf you have ever created or administrated a website on your own, you may feel more deeply how it affects your website traffic when the SWF banners, movies or slide shows are too big in size.
Then your will need to reduce SWF file size and keep a reasonable output video effect. If you’re looking for a solution that will help you compress SWF files on Mac, then you’re at the right place. Leawo SWF Compressor for Mac helps you to compress your SWF files with high quality. You don’t even have to know Flash technology well to compress SWF files. SWF files can be reduced up to 60% to 70% depending on the file properties.

Here’s how to compress SWF files with Leawo SWF Compressor for Mac:
1. Download Leawo SWF Compressor for Mac – http://www.leawo.com/download/macswfcompress_setup.dmg – and install it on your computer following easy and familiar installation steps.
2. Run the program, click “Add” button or drag and drop the SWF files in.

3. You will see your SWF files displayed in the file list.

4. For your convenience Leawo SWF Compressor for Mac provides selection of predefined optimization settings: Best, Good, Basic, Medium, Sprite and Custom. Just select one of them and you are ready to start optimizing.

5. If you want, you can dig deeper into each SWF parameter setting, just press the “Show More Options” button and you will be able to choose more profound settings up to your needs.

6. Detailed SWF parameters are separated into 5 groups: image, shape, video, audio and font. You may get to know the meaning of each parameter in the user guide of SWF Compressor for Mac. You can save your settings as a new profile.

7. After all settings are applied, press “Compress” button to start optimization process.

Want to compress your Flash videos and reduce SWF file size? Free download Leawo SWF Compressor for Mac:

-
Top 10 best camera apps from Play Store for Android mobile phone devices
Posted on March 19th, 2012 No commentsGoogle Play is a digital content service from Google which includes an online store for music, movies, books, and Android apps and games, as well as a cloud media player. The service is accessible from the web and Google TV, and mobile app Play Store on Android mobile phones as well. If you like shooting photos or images with your in hand Android smartphones, you may want to get some powerful but simple assistants to make the image or photo quality higher. And you may also know, there are bunch of apps in Android Play Store that can make your photos and images look better. These Android camera apps could improve your photos and images simply by fioltering or spicing them up with a cool effect. That’s to say, these apps could make some simple editing work for you. Of course, if you want to edit your photos and images for better look, you have to use professional image editor.
Today we could present you ten of these useful camera apps that will help you make your photos and images look better. Just check out the content below and feel free to download any single app that grabs your attention.
1. Paper Camera
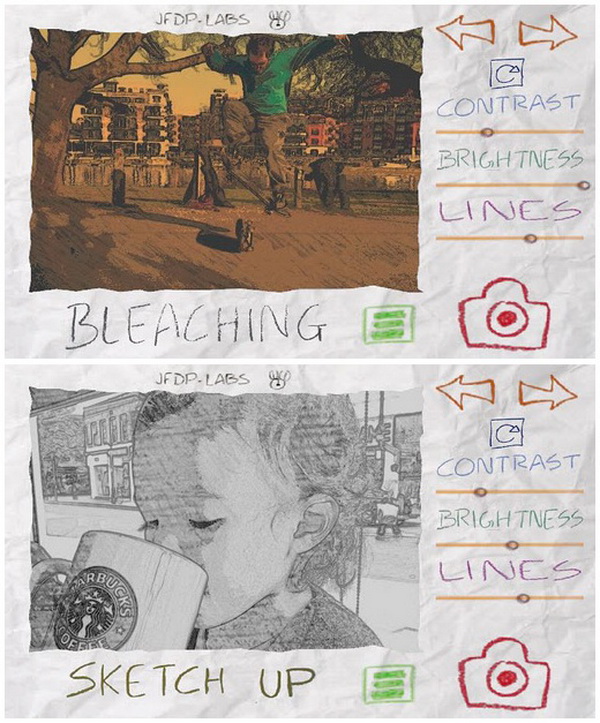 Want your photos to look like hand-drawn cartoons? That sounds like a job for Paper Camera. The bunch of cool effects in the app’s arsenal can easily cartoonify your images, and since all processing is done in real time, all you need to do is to press the shutter once you have the perfect frame in your viewfinder. Price: $1.99
2. Lightbox
 Think of Lightbox as a virtual community where people share their photos and where you can share yours too. The app offers a good selection of effects that you can apply to an image after taking it. Once you are happy with the result, you can easily post it on Facebook, Twitter, or Lightbox. Price: Free
3. PhotoFunia
 PhotoFunia is a fun app that can put your face on a billboard, a stamp, or a work of art such as the Mona Lisa. It has over 150 scenes and counting. All you have to do is to capture a photo of yourself, and the app takes care of the rest with the help of a little face detection magic. Price: Free
4. Retro Camera Plus
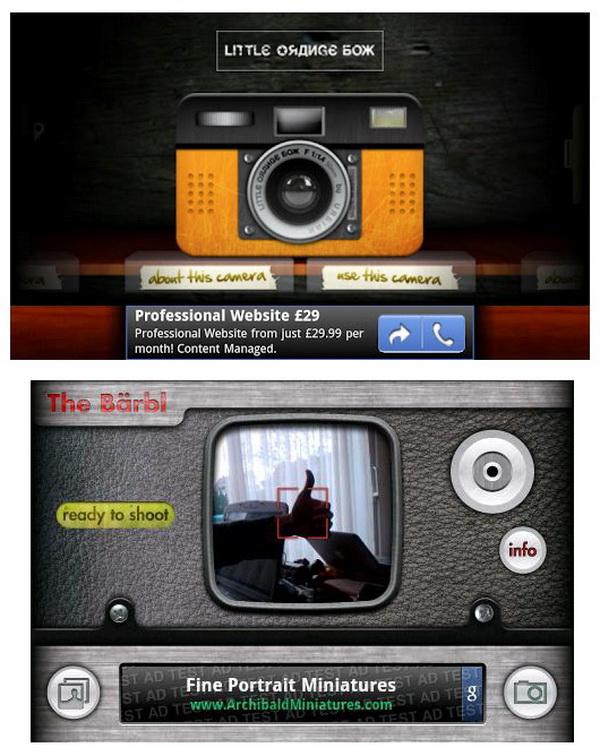 As you might expect, Retro Camera Plus is an app that can add an old-school look to your photos. It simulates a number of vintage cameras and has a nicely drawn interface too. And if you are not sure whether it is worth the $2.99, you can always try out the free version first.
5. Pudding Camera
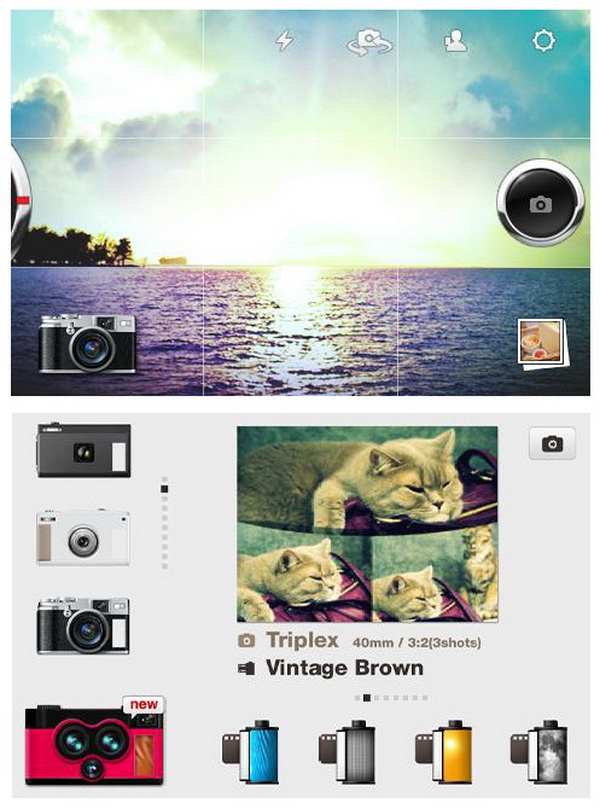 Pudding Camera is another app that you can use to customize your photos with. With its effects, it can make your photos look as if they have been taken with an analog film camera. Best of all, it is free, so checking it out won’t hurt, would it? Price: Free
6. Fast Burst Camera
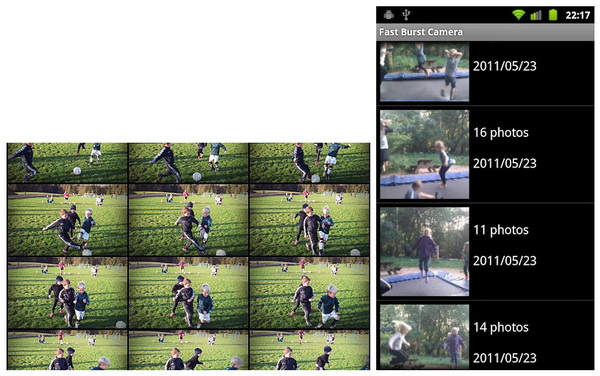 The title says it all. The Fast Burst Camera app comes in handy when you want to capture a moving object as it can take between 10 and 30 photos per second, depending on your device. And that is something that your stock camera interface cannot do. Bear in mind, however, that the images will not be taken at the camera’s maximum resolution. Still, if 30 photos per second is not enough, check out Ultra Burst Camera ($5.70), which should be even faster, yet shoots in only black and white in order to speed up the process. Price: $3.99
7. Camera360 Ultimate
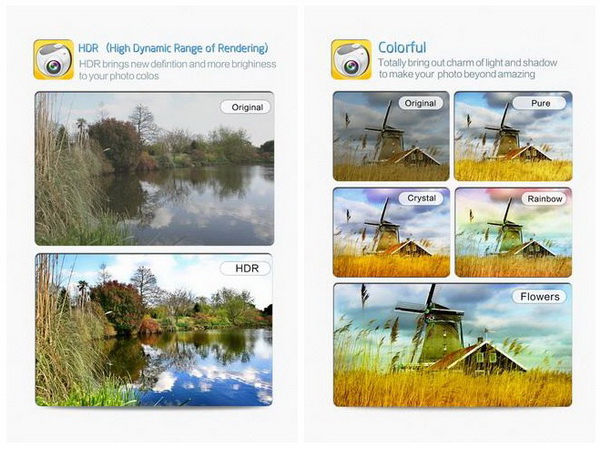 Camera360 Ultimate may be just another app that can manipulate images with filters and scene modes, but it should be on this list as it has tons of them. And the results are pretty good too, especially when you consider that the app does not cost a dime. Price: Free
8. HDR Camera+
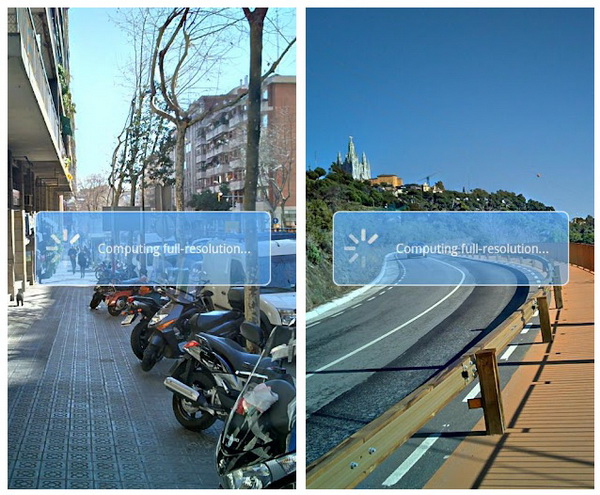 HDR stands for high dynamic range, and dynamics are something that images taken with camera phones usually lack. In plain words, if the lighting conditions are not optimal, only some areas of the image are properly exposed while others remain obscured. HDR Camera+ tackles that problem by capturing several images at different exposure values and combining them in a single HDR image. Not sure if it works? Then try the free version of the app first. Price: $3.99
9. MAGIX Camera MX
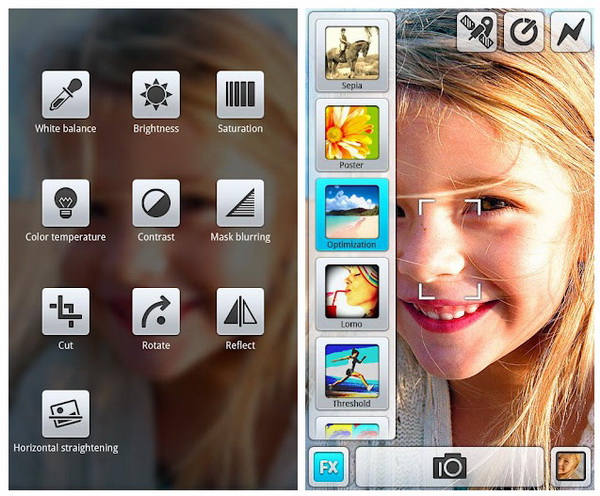 Yeah, MAGIX Camera MX may be another set of photo filters and effects, but what makes it stand out is that the result can be seen in real time. And as an added bonus, you can sign up for a 500MB online album where you can store your masterpieces. Price: Free
10. Camera Effects
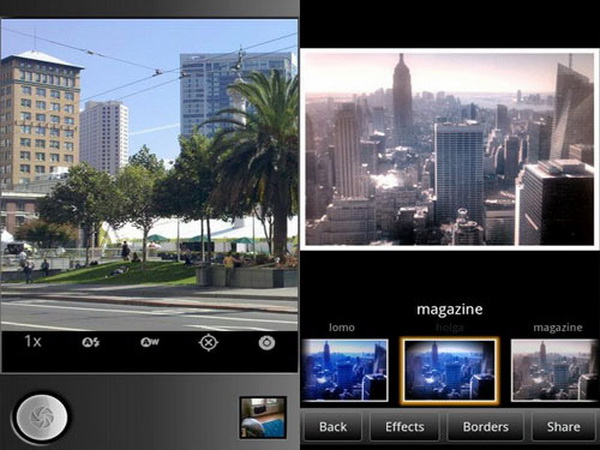 Camera Effects is a simple and easy to use camera app with a neat, uncluttered interface. In fact, you might find the app’s interface better than the one on your smartphone’s stock camera app. It has a broad range of effects that can make your photos look noticeably better. Price: Free
In case we have missed the camera apps which you like and you think should be presented here, let us know your thoughts by dropping your own idea on the comment part.
Related top suggestions:
Top 10 Paper-Replacement Apps for iPad and iPhone
Top 10 old school games for iPhone and Android smartphones
Top 10 Most Useful iPad Accessories for Business: Picture Galleries and Featuresзайм на карту rusbankinfo.ru


Recent Comments