5 Ways to Back Up And Export iPhone Contacts to CSV/VCF/HTML/PST file on PC
“I wish to export all my iPhone contacts to Outlook supported format or a single Excel worksheet. Is there a way to export all the contacts to a vCard or CSV file (not separate CSV files for each contact)? I have the contacts in both my iPhone and the iCloud, but iCloud allows export as a vCard only.”
Indeed, CSV format (comma-separated values with .csv extension name) is a contacts format widely accepted by many apps, like Google Contacts, Windows Contacts. The contacts in CSV format can be edited and reimported to a new iPhone/iPad/iPod touch or other devices, or imported into other email apps, like Yahoo or Gmail. The vCard, also known as VCF file, can be opened by Outlook and you can email to the contacts in vCard directly from Outlook.
As we know, contacts are designed to be synced with a supported application on your computer, such as an email app or iCloud, and so on, so in order to export iPhone contacts to CSV/VCF or other formats, we should export iPhone contacts to an app on the computer first and then export the contacts from app to CSV/VCF file on the computer. Whereas, if you use a third-party software, you can directly export contacts from iPhone to the computer as a CSV/VCF/HTML file for further use.
Method 1 Export iPhone contacts to CSV/VCF/HTML file with Leawo iOS Data Recovery
Leawo iOS Data Recoveryhas the function to directly backup/transfer/export/sync contacts from iPhone/iPad/iPod touch to the computer as a CSV, VCF or HTML file. With the powerful contacts recovery software, you can not only export contacts from iPhone to CSV and export iPhone contacts without iTunes, but also retrieve deleted contacts from iPhone/iPad/iPod touch and export them to the computer as an editable CSV, VCF vCard, or a printable HTML web page.
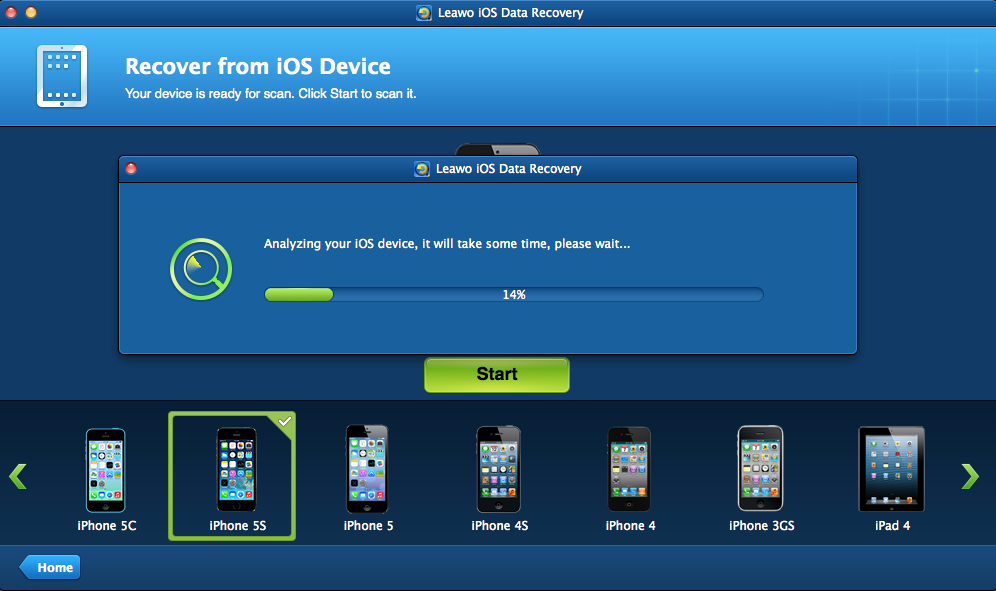
Step 1 Download Leawo iOS Data Recovery, run it on your computer, and connect your iPhone to the PC with a USB cable.
Step 2 Click “Start” button to begin scanning your iPhone.

Step 3 Preview and select the contacts found in the scanning. Then click “Recover” button to start to export contacts from iPhone to computer. Remember to select a saving location for the contacts to be output before recovery really starts. You can get the exported contacts in 3 formats: CSV, VCF and HTML.

Method 2 Export iPhone contacts to CSV/VCF file with Windows contacts
In order to export iPhone contacts to CSV with Windows contacts, first you need to back up iPhone contacts to PC by using iTunes to sync iPhone contacts with Windows contacts and then export them to the computer.
Part 1 Sync iPhone contacts with Windows contacts
Step 1 Download iTunes, install and run it on your computer, then connect your iPhone to the computer using a USB data cable.
Step 2 On the left sidebar of iTunes, you’ll find your iPhone under “Devices” entry, click your device to show the Summary interface.
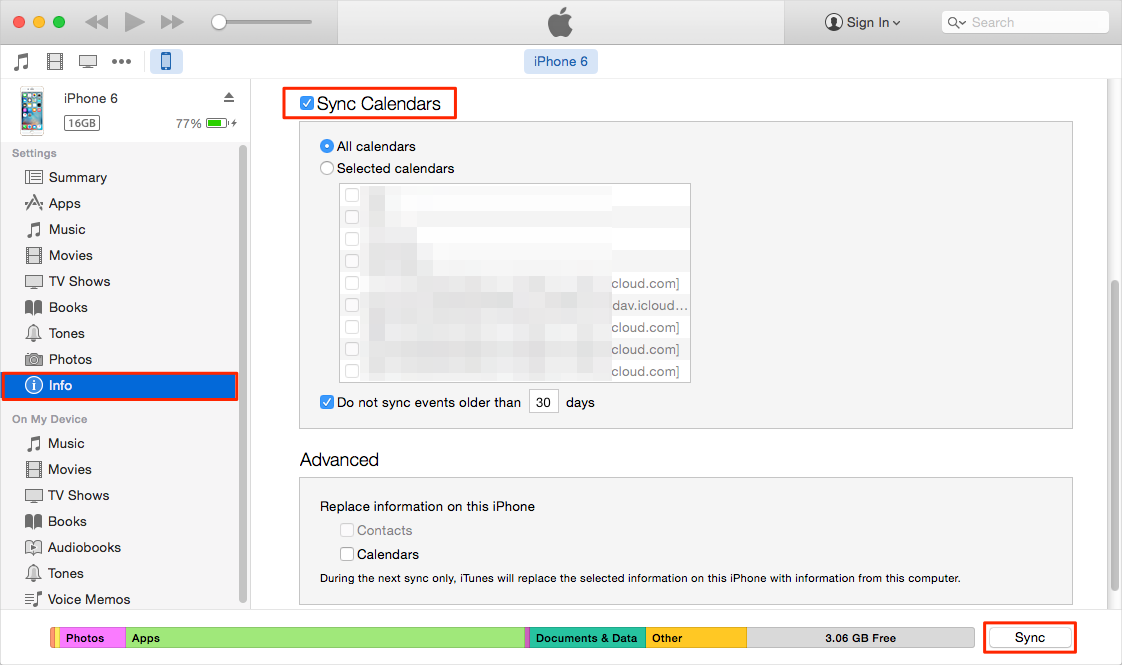
Step 3 Click on “Info” tab on the right interface, and click on “Sync Contacts with” checkbox, select “Windows Contacts” from the drop-down menu and click “Apply” or “Sync” button on the right corner. When iTunes has finished backup, you can close the iTunes.

Part 2 Open and export Windows contacts
Step 1 Press “Windows + R” keys on the keyboard to open “Run” window and type “wab” in “Open” filed and hit OK.

Step 2 Click on “Export” button to open the “Export Windows Contacts” window, and choose CSV or vCards, and click “Export”.

Step 3 Then click “Export”, and select a format you want to export the iPhone contacts to and hit “Export” button, then choose a saving location. You can choose to export contacts to CSV or VCF format. When you have exported contacts from iPhone to CSV/VCF successfully, you’ll see an export success tip message.

Method 3 Export iPhone contacts to CSV/VCF file with Google Gmail
The first part is similar to Method 2.
Part 1 Back up iPhone contacts to Google Contacts
Step 1 Launch iTunes on your computer and connect your iPhone to the PC using a USB data cable.
Step 2 Tap on your iPhone under “Devices” entry on the left sidebar of iTunes to show the Summary interface.
Step 3 Click on “Info” tab on the right interface, and click on “Sync Contacts with” checkbox, select “Google Contacts” from the drop-down menu and click “Apply” or “Sync” button on the right corner.

Part 2 Export Google contacts to CSV/VCF file
Step 1 Open Google Gmail and log into your Gmail account.
Step 2 Choose “Contacts” category from the top left corner. Then click “More” and choose “Import” in its pull-down list.

Step 3 From the pop-up “Export contacts” window, choose an export format format from the provided 3 formats: Google CSV, Outlook CSV or vCard (VCF). Then click “Export” and choose an opening method for the file to be output (for vCard, suggest to select Outlook as the opening method, for CSV, suggest to choose Microsoft Excel). Click “Export” again, then your contacts will be saved to the Internet explorer default saving location on your PC.

Method 4 Export iPhone contacts to CSV file with Outlook
Part 1 Back up iPhone contacts to Outlook Contacts
Step 1 Launch iTunes on your computer and connect your iPhone to the PC using a USB data cable.
Step 2 Tap on your iPhone under “Devices” entry on the left sidebar of iTunes to show the Summary interface.
Step 3 Click on “Info” tab on the right interface, and click on “Sync Contacts with” checkbox, select “Outlook Contacts” from the drop-down menu and click “Apply” or “Sync” button on the right corner.

Part 2 Export Outlook contacts to CSV/PST file
Here take Outlook 2010 as an example.
Step 1 Go to the menu bar, click File > Options > Advanced.
Step 2 Under Export, click Export.
Step 3 In the “Import and Export Wizard”, click “Export to a file”, and then click “Next”.
Step 4 Under “Create a file of type”, click the file type you want to export, such as “Comma Separated Values (Windows)”, also known as a CSV file, or an Outlook Data File (.pst), and click “Next”.
Step 5 Under “Select folder to export from”, select a folder from your computer, and then click “Next”. Note that you can only export one folder at a time. Then do according to the tips, when all these steps have been finished, click “Finish”.
Method 5 Export iPhone contacts to VCF file (vCard) with iCloud
To export iPhone contacts to vCard with iCloud, you should first back up your iPhone contacts to iCloud and next open your iCloud account on your computer and then export the contacts backup.
Part 1 Back up iPhone contacts to iCloud
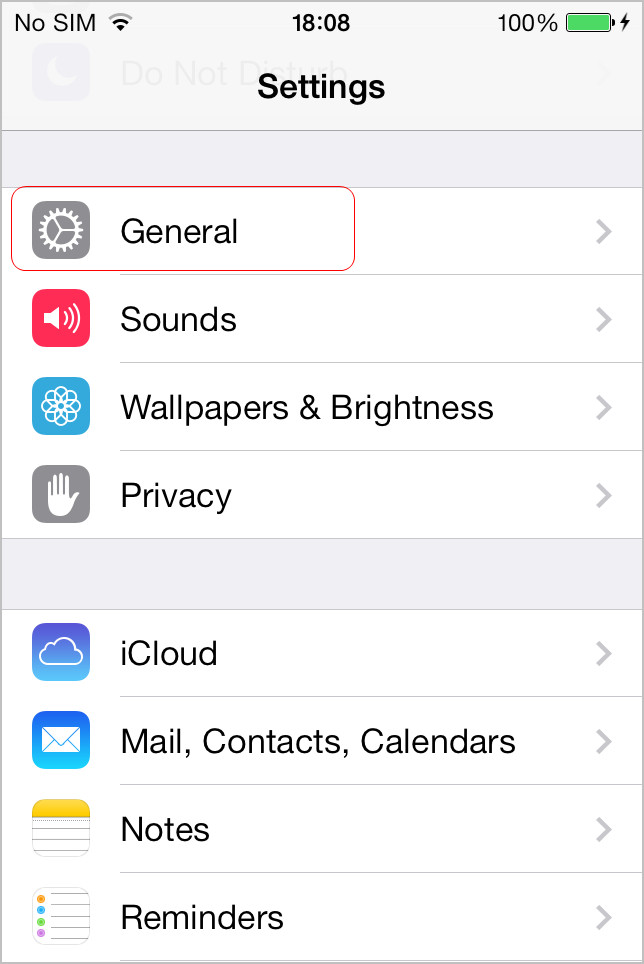
Step 1 On your iPhone, go to Settings > iCloud.
Step 2 Verify the iCloud account is set up and that “Contacts” is turned on.

Step 3 Scroll down and tap on “Storage & Backup” from the bottom of the interface. Then set “iCloud Backup” toggle to On and tap on “Backup Up Now” button.

Part 2 Export iCloud contacts to vCard
Step 1 When you have finished the contacts backup to iCloud, go to www.iCloud.com on the computer and log into your iClolud account by inputting your Apple ID and password.

Step 2 Click on Contacts, and Press Ctrl+A or Control-click the contacts one after another to select all the contacts, then look for and tap on the “gear” button on the lower-left corner, and click on “Export vCard” to export all the contacts to the default saving location of your Internet explorer on the computer. Note that iCloud only allows to export contacts to a vCard (Outlook VCF format file) onto the computer.
If you want to import CSV/VCF contacts backup to iPhone after finishing iOS upgrade or iPhone jailbreak, you can refer to this article – 5 Free Methods to Import CSV/VCF Contacts to iPhone 5/4S/4/3GS.
Share this post