Leawo Prof. Media User Guide
Leawo Prof. Media is the most powerful media converter software package that provides one-stop solution for your various video processing demands.
This total media converter can facilitate your video conversions in the following way: convert regular video/audio/HD video/DVD/Blu-ray to popular video formats; burn all kinds of video to DVD and Blu-ray disc, and also other DVD/Blu-ray outputs like DVD/Blu-ray folder and ISO; accelerate the downloading and playback of flash videos from YouTube and many other video sharing sites.

Convert Video
and Audio
Rip Blu-ray
and DVDs
Burn Blu-ray
and DVD
Download
Videos
Advance
Settings
Convert Video and Audio
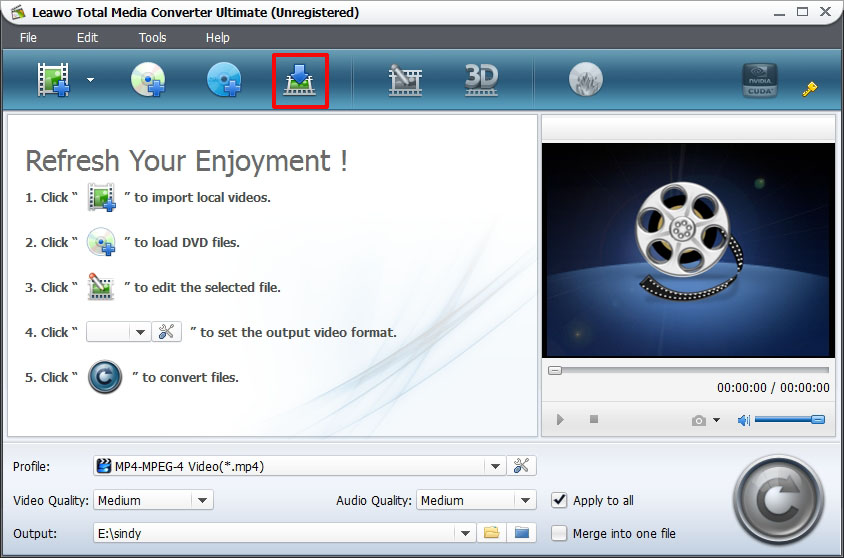
Step 1Import source files
By clicking on the "Add Video" button, or directly drag and drop the video files to the interface, the video and audios you need will be imported to the software processing list.
Tips: if you want to merge multiple files into a single one, select what you want in the software processing list, right click on the chosen files and then choose "Merge". Or you can complete in this way: "Edit"> "Merge".
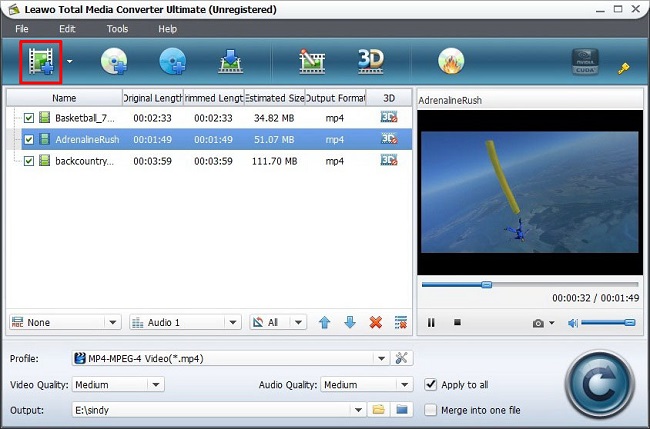
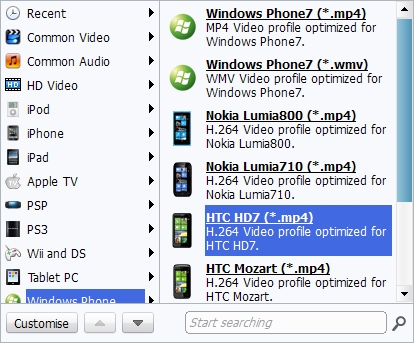
Step 2Choose Output Profile
Select your desired video or audio output from "Profile" menu and use the quick search bar located at the bottom to help search the target format among dozens of available options quickly.
Step 3Start video/audio conversion
Simply clicking on the big Convert button, you are able to get media conversion started.

Rip DVD/Blu-ray
Step 1 Load DVD or Blu-ray files
Via the "Load DVD" or "Load BD" button, or by means of direct drag-and-drop, you can load the corresponding files to the software. Double click on the video in processing list you can have a preview on it. And video screenshot is permitted for enriching image library.

Step 2Choose format for output
Within the "Profile" option, you can find lots of video and audio formats that are compatible with different devices and players. Pick up the right one according to your specific needs. For a quick format positioning, you can take advantage of the file search function which enables you to search for format through keywords.
Step 3Start to rip DVD/Blu-ray
Click on the Convert button then you are able to convert DVD and Blu-ray to target formats for ultimate playback.

Burn to DVD/Blu-ray
Step 1Add video files
Video files on your local computer, various players, and storage devices or from online websites can be taken into uses. Import them to the software easily. Preview the file by double clicking on it or take screenshot from video.

Step 2Preview Menu Template
This program provides you with multiple DVD/Blu-ray menu template themes: Standard, Business, Education, Holiday, Nature, Others, Customized. Select one template according to your preference and have a menu template preview. Video preview is also permitted, what you only need is a simple click on the target video on menu preview window. If the built-in menu templates can't t meet with your specific requirements, click on "Disable Menu" button and turn to "Design Menu" button to customize menu in details.

Notes:
Main: play or select chapter
Title: chapter list pages
Circular virtual keys: when there is no video preview, it enables you to position the wanted video Upward, Downward, Leftward or Rightward, press the centric button to confirm the target video; when there is video preview, click on the four-direction keys to play the current or next video, the centric button plays as Play and Pause functions.
Step 3More DVD/Blu-ray burning settings
If you do not need additional menu customizations, you can just skip Step 3 and directly click on the "Next" button.
Volume Label: input your own volume label
Burn To: burn video to ISO File or DVD Folder or Blu-ray Folder
Save To: output Blu-ray/DVD video saving path on your computer
TV Standard: choose NTSC or PAL according to region
Size: output DVD video size (by default), Blu-ray video size (1280X780 or 1920X1080)
Disc Type: burn video to DVD-5/DVD-9, BD-25/BD-50

Step 4Burn to DVD & Blu-ray
Insert blank disc to your drive, and then click on the "Start" button.

Download Online Videos
It lets you to easily and swiftly download and play YouTube videos and videos from other online video-sharing websites with accelerated speed.
Step 1Click on "Download Video" icon.
Step 2Enter the URL of the online video to the address bar.

Step 3Download and play online video in an accelerated speed.

Advanced Settings
Part 1Edit Settings
The "Edit" section is prepared for you to add some unique features to the output videos.
1. Trim video: under "Trim" option, get an exact video length by dragging the slider directly, or set value in Start Time and End Time. The total Clip Length will present to you.
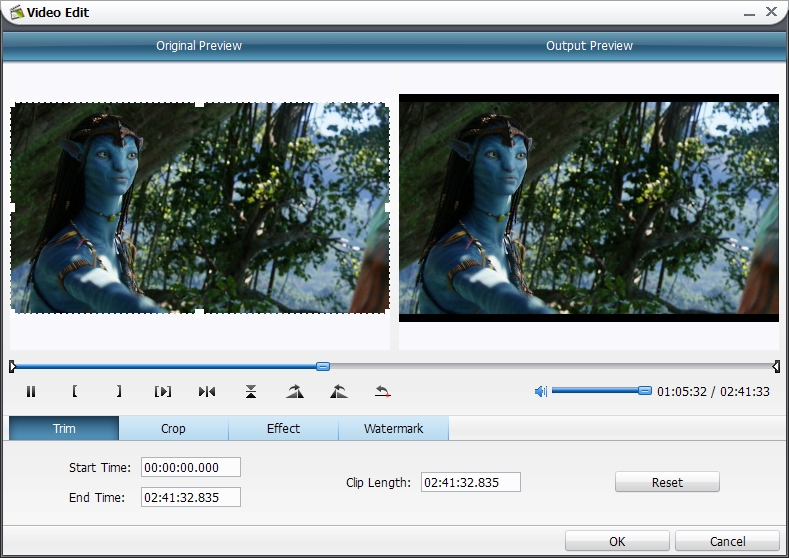
2. Crop video: under "Crop" option, cut video to a specific size by dragging the dot frame, or set value in Left, Top and Cropped Size.

3. Effect video: under "Effect" option, apply effects to video by dragging sliders of Brightness, Contrast, Saturation and Volume Zoom.

4. Watermark video: under "Watermark" option, add logo or banner to video. Check "Enable Watermark" and you can choose to add image or text watermark. Watermark Transparency, Left Margin, Top Margin and Image Size can also be set.

Part 22D to 3D Settings
Enter "3D Settings" section to burn video to 3D video and set 3D Depth effect. There are multiple 3D setting modes prepared for you: Red/Cyan, Red/Green, Red/Blue, Blue/Yellow, Interleaved, Side by Side, pick up one for 3D video creation. To set 3D Depth effect, you can directly drag the slider of 3D Depth or adjust the value in 3D Depth box.

Part 3Design Menu Template
After you have click on the "Design Menu" button, you enter the panel in which you are allowed to customize menu by means of Themes, Background, Button, Caption and Advanced.
1. Under "Themes" option, you will get approach to many DVD and Blu-ray menu themes, and each theme contains lots of submenus, you can pick up one at your will.

2. Under "Background" option, you can freely choose DVD and Blu-ray background via Gallery, Color, Picture and Video.
a. Gallery: select one menu from Standard, Business, Education, Holiday, Nature, Others and set as background.
b. Color: there are three colors and you can take the color mixture as the background. Background Angle and Position can be adjusted.
c. Picture: load an image file from your PC to save as background.
d. Video: import a video file from your PC and save as background.

3. Under "Button" option, it allows you to choose specific Frame Style and Icon Style.

4. Under "Caption" option, click on one file on the preview area and input a new caption. Several caption properties like font, size, color, etc. can be adjusted.

5. Under "Advanced" option, you can make a decision on file name displaying on menu or not, number of chapters on each submenu. Style of the focused menu item also allowed being set. Choose Frame or Mark and then select the corresponding color or shape. After setting, the set items will display the corresponding effect with your mouse clicked on.

![]()
Users Say
As consumers, I love companies offering solid product guarantees. It proves the company has faith in its product, and is making a solid effort to gain your trust.
-From Donald through our support center
Social Network
Join Our Newsletter: