OBS Studio Review: How Good Is It for Recording Your Screen?
Summary:
This is an in-depth article about OBS Studio, providing practical advice for readers with different needs. If you are still struggling to choose screen recording software, then don’t miss this review.
MenuCLOSE
This review will comprehensively introduce OBS Studio, one of the most popular free screen recorders for pc, providing a detailed analysis of its core features, operational steps, and suitable user groups. If you are somewhat interested in screen recording and live streaming, you certainly shouldn’t miss OBS Studio, as it is quite a professional recording software. It is worth mentioning that the latest version of OBS Studio has received a major update, introducing a new Metal graphics API backend, which brings significant performance improvements for Mac users. However, does this mean it is more suitable for regular users rather than beginners who just want to record a screen easily? Does it appear complicated because it is too powerful? This OBS Studio review will take you to find out.
Part 1: What Is OBS Studio?
OBS Studio is an open-source screen recorder for PC specifically designed for real-time video capture, synthesis, encoding, recording, and live streaming. It supports all platforms including Windows, MacOS, and Linux, allowing users to create scenes composed of multiple sources (such as window capture, images, text, cameras, and even game screens), and seamlessly switch between these scenes. Additionally, it enables you to stream your games to platforms like Twitch and YouTube. It is a powerful program, although its strength might be excessive for those who merely want to quickly and simply capture games. However, you don’t need to worry too much because OBS Studio will help you optimize the settings for streaming or recording videos when you first launch the program.

Part 2: Core Screen Recording Features
Next, I will tell you why I say OBS is a powerful tool. This is evident from its several core features.
1. Recording Modes
The core of OBS is based on the combination of “scenes” and “sources”. Users can create an unlimited number of scenes, and within each scene, they can add any number of sources. Therefore, various sources can be used, including display capture, game, audio, browser, and so on. It also has multiple modes, such as display capture, window capture, game capture, and video capture, to meet the needs of different users.
2. Video Output Options
OBS provides very detailed output settings to meet a range of needs from beginner to professional. First, in terms of encoder selection, it supports x264, NVENC, AMD VCE, and the latest AV1 encoding (hardware support required), allowing users to choose the optimal solution based on their hardware configuration. Secondly, regarding resolution and frame rate, it supports custom canvas resolution and output resolution, and the frame rate can be set up to 240fps or even higher, which can meet the needs of slow-motion video production. Lastly, for recording formats, it supports various formats such as MP4, MKV, MOV, and mixed recording can be set.
3. Audio Recording Capabilities
OBS has a powerful mixer that can separately capture desktop audio and microphone audio and apply individual filters to each audio track. It also supports third-party VST plugins, which can help you achieve professional-level sound processing effects.
Part 3: How to Use OBS to Record Your Screen?
Although OBS has a variety of functions, its interface is still relatively clear, so even if you are a new user, using OBS for screen capture and streaming is not difficult. The following are the specific steps:
Step 1: Download and install OBS Studio.
Step 2: Click the default “Scene” in the lower left corner.

Step 3: Then click the “+” in “Sources”. Choose “Window Capture” and then click “OK”.

Step 4: Click the “Settings” in the lower right corner of the interface, select “Output”, and choose the recording path according to your personal needs.

Step 5: Click the “Start Recording” to begin recording. Once finished, the video will be saved to the specified folder.

Part 4: Advantages and Drawbacks
Although OBS is powerful, it is not suitable for everyone. Below, I will briefly list its advantages and disadvantages to give you a more intuitive understanding of whether OBS is right for you.
Pros:
- Completely free
- No watermark
- No recording time limit
- Customizable
- High resolution and high frame rate
Cons:
- Higher learning curve compared to other tools
- Sometimes overpowered for basic recording tasks
Part 5: Best Alternative for Simple Screen Recording
If your screen recording needs are relatively small and you don’t require the powerful functions of OBS, but just want to find an easy-to-use screen recording tool, then I recommend you to use Leawo Free Screen Recorder. It is a lightweight and completely free screen recording software that also supports various recording functions, suitable for teaching, meetings, game live streaming and other scenarios. It has multiple recording modes, 4K ultra-high-definition quality, and can record both system sounds and microphone sounds. It also has independent volume adjustment, picture-in-picture mode, real-time annotation, scheduled recording, no watermark and no time limit functions. Its interface is very simple, and users can customize it according to their own needs. The usage steps are also very simple:
Step 1: Download and install Leawo Free Screen Recorder.

-
4-in-1 screen recorder suite to record gameplay, tutorial, training video, lecture, reaction video, webninar video, etc.
- Free online recorder to record window, browser tab or entire screen online.
- Free screen recorder to record screen in full-screen or custom area at up to 4K to MP4.
- Free webcam recorder to record webcam video.
- Free audio recorder to record audio from microphone or computer to MP3.
- Free screenshot snapper to snap screenshot to JPG.

Step 2: Click on “Record Screen” and select the area that needs to be recorded.

Step 3: Switch the system sound and microphone on or off as needed.

Step 4: Click on “REC” to start the recording. Once completed, the video can be found in the recording history.

Part 6: Final Verdict: Is OBS Studio Worth It?
Regarding whether OBS Studio is worth using or not, there is no definite answer. The key factor in determining whether it is worth using lies in whether it can meet your needs while allowing you to overlook its shortcomings. In summary, as OBS Studio has evolved to this point, Thanks to its free nature, powerful customization capabilities and cross-platform support, it has become a benchmark in the fields of live streaming and professional screen recording.
If you fall into any of the following categories, I think it would be very suitable for you: -Often record gameplay and content creators: Require complex scene transitions and meticulous picture adjustments. -Users requiring multi-source input: such as scenarios where multiple cameras, capture cards and window sources are simultaneously connected.
If you do not fall into any of the above categories, but instead possess the following characteristics, then you might consider the Leawo Free Screen Recorder that I recommend: -The recording requirements are relatively low and they don’t like complex recording tools.-Don’t want to spend time on studying any parameter settings, just want to record quickly.
Finally, my suggestion is: If you’re not sure, you can first try OBS to see if you need its professional live streaming functions or more extreme picture quality control. You can also try Leawo Free Screen Recorder. Anyway, they are all free to use.
-
TunePat VideoGo All-In-One Review: Really of Great Value?
-
YouTube TV DVR Explained: How It Works, Limits, and Tips
-
4 Easy Methods: How to Download Reddit Videos?
-
How to Watch Movies with Friends Online Together?
-
Cyberlink PowerDVD Review: Best Paid Media Player?
-
ScreenRec Review: Real Performance Test
-
Best Ways to Watch YouTube Videos Offline Without Internet
-
How Many People Can Share a Netflix Account?
-
5 Proven Methods to Watch YouTube Without Ads
-
How Long Do Recordings Stay on YouTube TV? Full Breakdown


-
Best Twitter Porn Accounts You Shouldn’t Miss
-
How to Download Pornhub Videos? Ways to Download from Pornhub
-
Top 5 OnlyFans Viewer Tools to View OnlyFans Content for Free
-
Full Review of Savethevideo: Is Savethevideo Safe & How to Use it?
-
How to Download MissAV Porn Videos in HD for Offline Viewing?
-
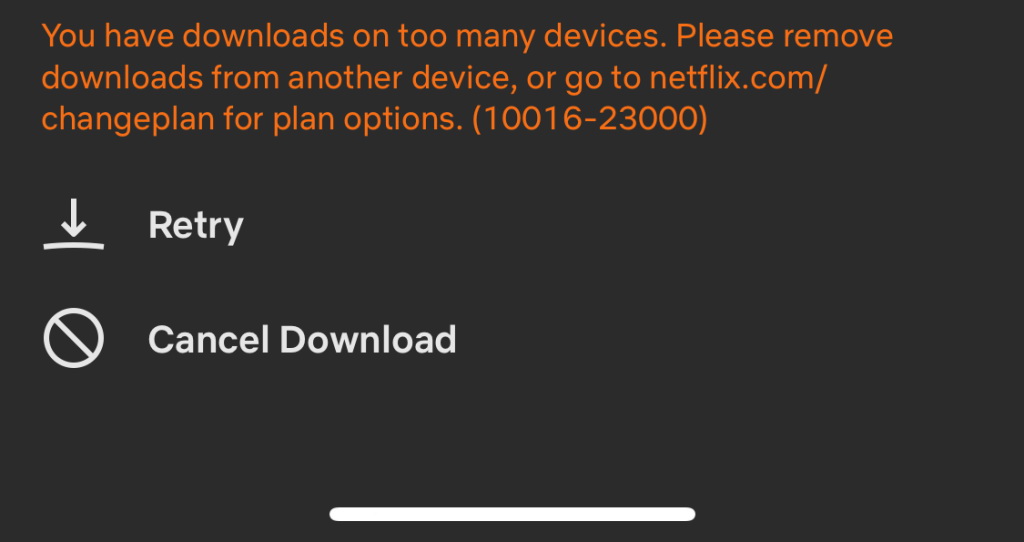
Netflix Download Limit: What it is & How to Avoid
-
Full Guide to YouTube Members Only Videos: Watch, Download
-
How to Import Bookmarks from Safari to Chrome
-
How to Download Videos from Fansly with Fansly Downloader
-
4 Methods to Burn ISO Files to Blu-ray Discs Easily