Last updated on 2017-12-18, by
3 Ways to Transfer Photos from iPhoto to iPhone
Do you know how to transfer photos from iPhoto to iPhone? If you have no idea on this question, you can check it out in this guide. iPhoto is a photo manager app on Mac. If you have just bought an iPhone, you may wonder how to get photos from iPhoto to iPhone. The passages below will show you 3 ways to solve this problem: iTunes, iCloud Drive and iTransfer for Mac. If you learn these methods, there will be no need for you to worry about this problem any more.
Part 1. How to Transfer Photos from iPhoto to iPhone with iTunes on Mac
As an iPhone and Mac user, it is easy for you to solve the problem of “how to get photos from iPhoto to iPhone”. Let’s have a look on the following steps.
With iTunes installed on the Mac computer, iPhone users are able to sync photos from computer. The photos will be saved in the Photo Library on your iPhone. The pictures can be seen and edited on your iPhone. To sync your pictures from your iPhoto library to your iPhone, follow the steps below:
1. First, to install and run the iTunes on your Mac. Then, tap “iTunes > Edit > Preferences > Devices” successively.
2. Check the option of “Prevent iPods, iPhones and iPhones from syncing automatically”.
3. Use a USB cable to plug your iPhone into Mac. The iTunes on your computer will launch automatically. If it fails, you have to open iTunes manually.
4. When iTunes on your computer recognize your device, tap the icon of iPhone, and select the “Photos” tab under the panel of “Settings > Summary”.
5. Click the option of “Sync Photos from”. Then, choose the file folder that the photos have been saved in. Finally, click “Sync” at the right bottom.

Part 2. How to Transfer Photos from iPhoto to iPhone with iCloud Drive on Mac
Besides using iTunes, you can also take the advantage of iCloud Drive to move photos from iPhoto to iPhone. You first need to make sure you have downloaded and installed iCloud Drive on your iPhone. The steps below will tell you how to transfer photos from iPhoto to iPhone without iTunes.
Step 1: Open the website “iCloud.com” on your computer, and then input the same Apple ID account on your iPhone to enter into iCloud.com.
Step 2: When you are in the account of iCloud.com, you can tap the iCloud icon to go into the iCloud Drive space.
Step 3: When you are in your iCloud Drive space, you need to choose the Cloud shaped upload icon to tap, then you can select the photos that you would like to transfer from Mac to iCloud Drive.
Step 4: Launch the iCloud Drive app on your iPhone after you upload the photos to iCloud Drive. Then, you will see all the transferred pictures on your iPhone.
Step 5: Then, you can tap the picture file to open it and invoke the panel at the bottom of the interface. After that, a share icon will display. Tap the share icon, and then the pictures will be downloaded to your iPhone successfully.

You can have a try to solve the problem of “how to get photos from iPhoto to iPhone” easily with this method. Besides using iCloud Drive, if you have no idea on how to transfer photos from iPhoto to iPhone without iTunes, you can also use iTransfer for Mac to help you. Let’s check it out in the third part.
Part 3. How to Transfer Photos from iPhoto to iPhone on Mac without iTunes but iTransfer for Mac
iPhone users can also use Leawo iTransfer for Mac to transfer photos from iPhoto to iPhone. Among all the transfer programs for iOS devices on Mac computers, Leawo iTransfer for Mac is really quite good to use. This software enables users to transfer files among iOS devices, iTunes and Mac computers without the sync of iTunes, and users can transfer various kinds of files easily. The following steps will show you how to move photos from iPhoto to iPhone.
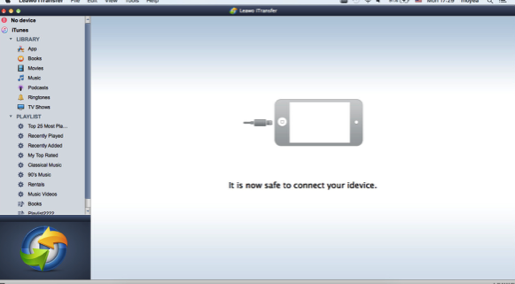
Run Leawo iTransfer and Plug iPhone into Mac
Run Leawo iTransfer for Mac and plug iPhone into Mac with matched USB cable. The libraries of your iPhone will be automatically detected by iTransfer. The libraries will be displayed in the left of the interface.

Tap “Photos” Library and Then Add File to iPhone
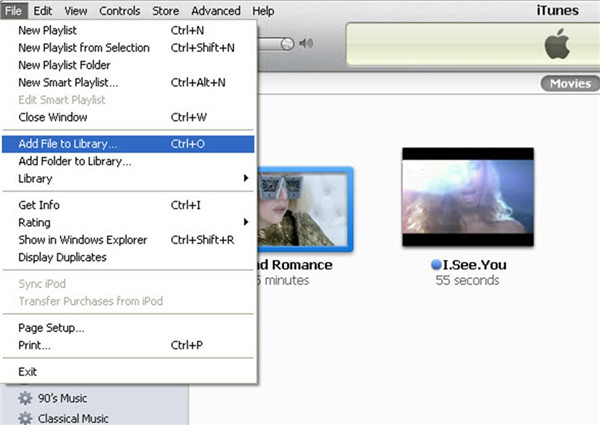
Tap the name of your iPhone and choose “Photos” tab under the menu of “LIBRARY” in the lift of the main interface. The uploaded pictures on your iPhone will be shown in the right part of the main interface. If there is no pictures in the “Photos” library, iTransfer will offer you with an “Add File” button for you to download pictures to your iPhone from your computer. You can realize this operation by clicking “File > Add > Add File/Add Folder” to add pictures to your iPhone from Mac.

Choose Photo Files and Transfer
After selecting the pictures that you need, Leawo iTransfer for Mac will start importing photos from iPhoto of Mac to iPhone. The progress bar in the pop-up dialog will display you the rate of the transfer process. You only need to wait until the transfer process is over. Finally, you will get all the selected pictures in your “iPhone Photo Library”.

With this wonderful software to help you, it will be needless for you to seek for the answer to the question: “how to move photos from iPhoto to iPhone”.
This guide has offered you 3 ways to get photos from iPhoto to iPhone. Choose one method to try and you will know there is no difficulty at all to help you get rid of the problem of “how to move photos from iPhoto to iPhone”.
-

[Review] Best Disney Plus Downloader to Use for 2024Vinho/2024-03-11
-

[2024 Guide] Best Methods to Download Hulu Episodes OnlineCassie/2024-03-24
-
Netflix Download Limit: What it is & How to AvoidAugust/2024-02-18
-

5 Best Netflix Video Downloaders in 2024August/2024-02-18
-

Detailed Guide on How to Download Movies on Disney PlusVinho/2024-01-30
-

How to Import Bookmarks from Safari to ChromeCynthia/2018-01-04
-
3 Ways to Transfer Files from PC to iPhoneCynthia/2017-12-18
-
How to Get Photos from iPhone to MacCynthia/2017-12-18
-
3 Ways to Transfer Photos from iPhoto to iPhoneCynthia/2017-12-18
-

How to Airdrop from iPhone to MacCynthia/2017-12-07
-

How to Play MKV Files on PCDavid Brooks/2016-11-03
-

Best DVD player software – How to play DVD movies in WindowsDavid Brooks/2014-03-16
-

How to change region code of Blu-ray player software while playing back Blu-ray discsDavid Brooks/2013-08-20
-
How to Recover Photos from Samsung Galaxy S3?Dupont/2013-08-01
-
5 Free Methods to Import CSV/VCF Contacts to iPhone 5/4S/4/3GSAmanda/2013-07-14
-

How to Transfer Movies from Computer to iPad retinaWebber/2013-05-29
-

How to download PSY – GANGNAM STYLE video to computer, iPhone 5, Galaxy S IV, Lumia 920, Xperia Z, and other devices for totally freeDavid Brooks/2014-01-26
-
3 Methods to Transfer Photos from iPhone 5 to ComputerTony/2013-05-15
-

KMplayer vs. GOM Player – Find the better Windows media player software for youDavid Brooks/2014-03-16
-
How to Import Bookmarks from Safari to ChromeCynthia/2018-01-04
