-
PowerPoint Tips – Grow/Shrink Animation to Photo
Posted on April 27th, 2012 No commentsIn this article we are going to tell you about the Grow/Shrink animation in PowerPoint 2010. Maybe you haven’t used it before, never mind, this is the right place for you to learn how. Grow/Shrink is one of the animations that original come along with PowerPoint 2010. Just like its animation brothers, it can be added to text or picture. But I think it would more useful adding to picture.
Assume that you’re making a Photo slideshow and PowerPoint is really an easy and powerful tool for you. Now, click “Insert” → and choose “Photo Album” to import all your photos into PowerPoint at one time. Each slide will have one photo on it.

Now you need to add some animations to these photos to make them alive. We have already used animations like “Fly In”, “Float In”, “Zoom” or “Bounce” too often, let’s try Grow/Shrink today!
Step 1: Select one photo and click “Animations” → “Add Animation” to add an animation to the picture. For PowerPoint 2007, this is a little different. You should click “Animations” → “Customize Animation” → “Add Effect” to add an animation.

Step 2: In the drop-down list, you will see many animations you can add to the photo and the “Grow/Shrink” animation is the one we need.
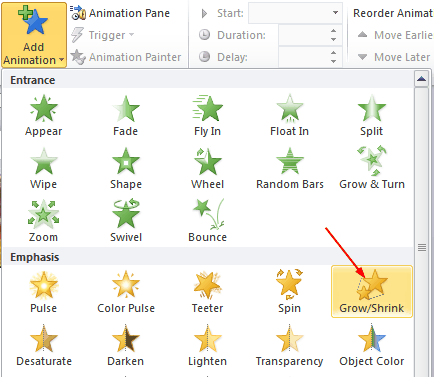
Step 3: Now click the mouse and the photo will expand to 150% larger by default (you can change the size too, you will see it later). The problem is that once clicked, the photo will remain the 150% size, and we need to shrink the photo back to normal. Insert the “Grow/Shrink” animation again. And click the “Animation Pane” to adjust the second animation.

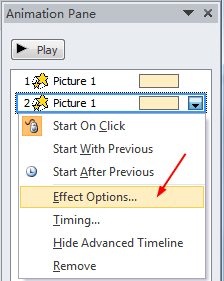
Step 4: The “Animation Pane” section will appear on the right of the slide section. Right click on the animation 2 and click “Effect Options”.
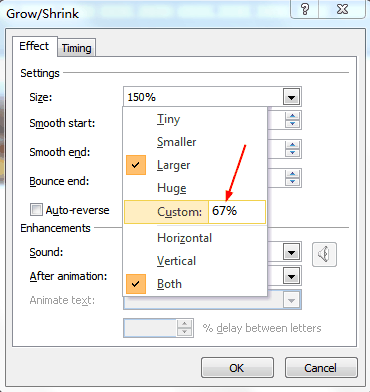
Step 5: In the pop up window, you will see the default size is “150%” (you can change the Grow size here), to click the mouse again and shrink the photo back to normal size, you should set the size as “67%” (100/150) and press “Enter”.
Try it! Click on the photo once and it will grow to 150% larger, click again and it will shrink back to normal, like:

займ на карту rusbankinfo.ru
-
How to Add Rotate Animation to Images in PowerPoint 2010
Posted on January 17th, 2012 No commentsYou know, we can click “Insert” → “Picture” to add one image to the PowerPoint slide, or “Insert” → “Photo Album” to add multiple images to create a PowerPoint photo album with one picture on each slide. After we inserted the image into PowerPoint, it is placed in one location stagnant. We can leave it there or we can animate it. The following will show how to add the animation effect to make the image rotate on an axis when show up in PowerPoint 2010.
1. Import the image into PowerPoint 2010 by clicking “Insert” → “Picture” and then select the image you want to animate and click “Insert”.

2. Select the image and click “Animations” tab on the ribbon → “Add Animation” → choose “Swivel” or “Spin” as the animation.

3. Now click “Preview” to test the animation.

4. If you don’t like the animation, you can click “Animation Styles” to change to another one.
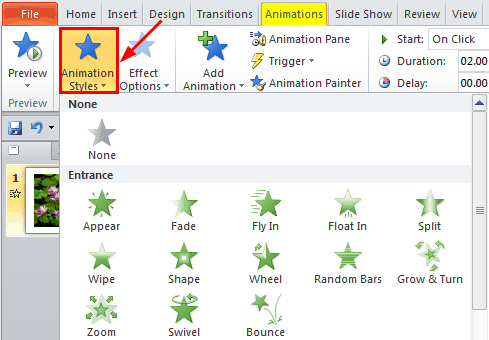
In PowerPoint 2007, the animations are a bit diifferent. Click “Animations” → “Customize Animation” to add an animation effect to the image. You can chosse “Spinner“, “PinWheel” or “Swivel” to get the simliar effects.
займ на карту rusbankinfo.ru


Recent Comments